Array Erase
Get Started

Quick-Start Videos
Quick-Start Guide
Sample Certificate
Brochure
FAQs
Setup and Erasure with Array Erase
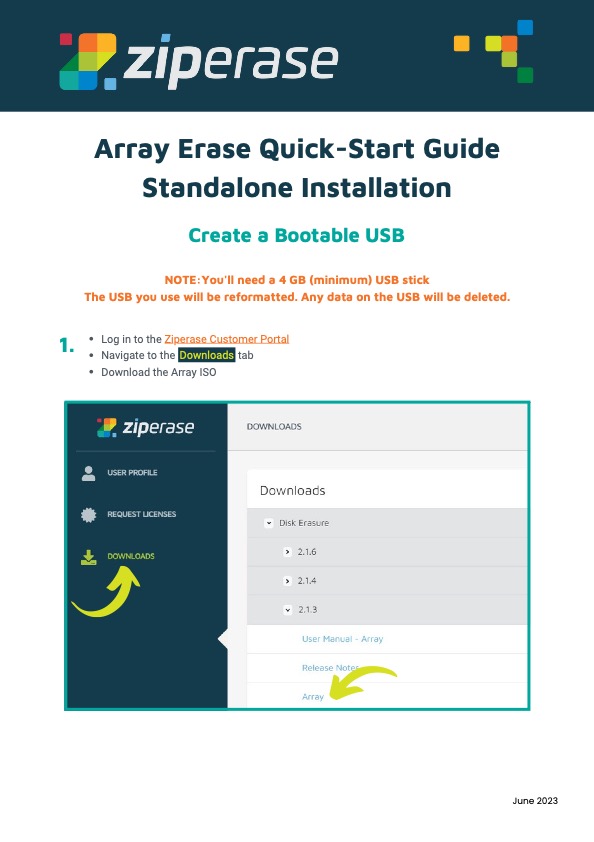
Array Erase Quick-Start Guide
Page 1
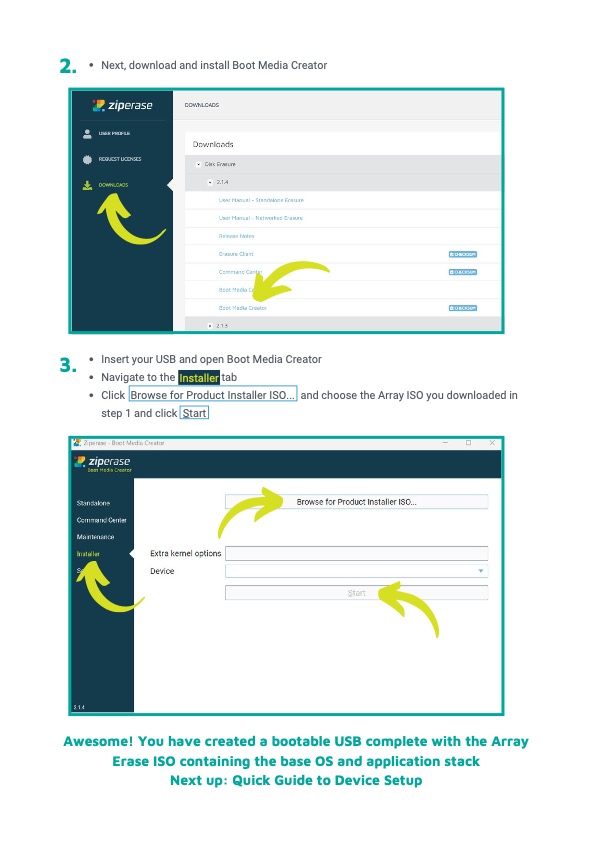
Array Erase Quick-Start Guide
Page 2

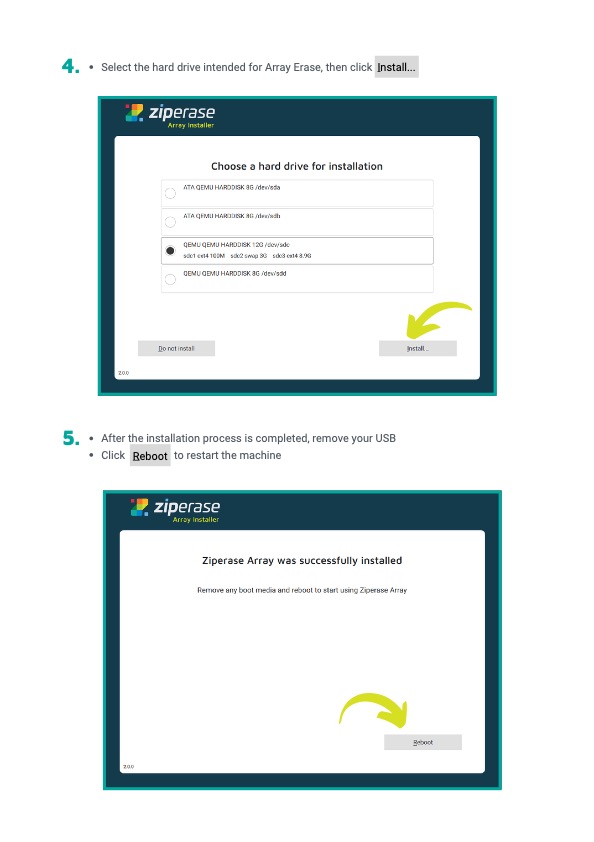
Array Erase Quick-Start Guide
Page 3
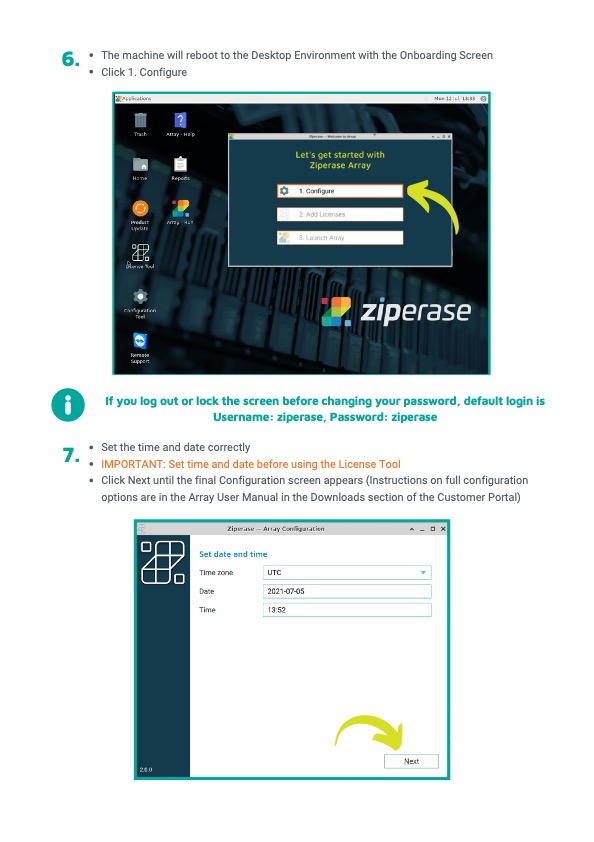
Array Erase Quick-Start Guide
Page 4
Array Erase Quick-Start Guide
Page 5
Array Erase Quick-Start Guide
Page 6
Array Erase Quick-Start Guide
Page 7
Array Erase Quick-Start Guide
Page 8
Array Erase Quick-Start Guide
Page 9
Array Erase Quick-Start Guide
Page 10
Array Erase Quick-Start Guide
Page 11


What is Array Erase?
The Ziperase Array software is designed to erase both SSDs and HDDs connected directly or via disk array expansions. The software is controlled by an array server or host that manages everything from selecting the erasure method to reporting the progress. If the connected hardware supports it, individual drives can be hot-swapped to increase productivity in a production environment.
The Ziperase Array Erase server can perform its erasure offline without an internet connection.
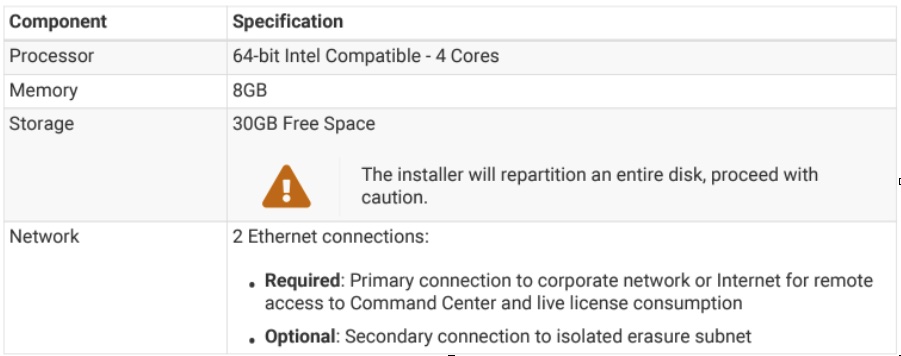
What are the system requirements for installing Array Erase?
How do I configure Array Erase?
After installing and rebooting, you will see the desktop environment and an onboarding screen that looks like this:
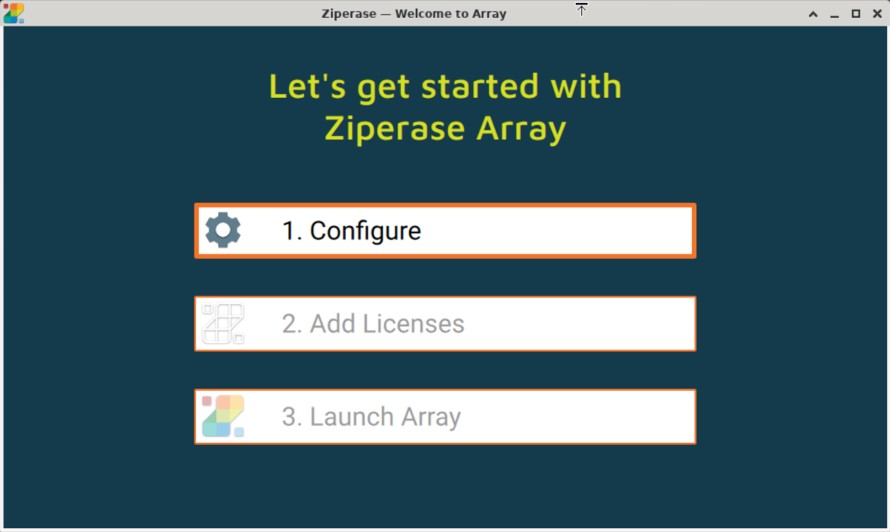
Click “1. Configure” in the onboarding screen to launch the configuration wizard that will walk you through the steps.
IMPORTANT: Set date and time: Make sure the Array server’s time and date are set correctly. If the time and date are changed after creating the license store, it may cause the store to be locked.
Can I add company branding to the erasure reports?
Yes, you can personalize the erasure reports generated by the Ziperase Array app with your company’s branding. When setting it up, you’ll have the choice to upload a logo image, which will be displayed on each PDF report. This adds a personal touch that matches your company’s brand.
How do I map or label my disk enclosures?
- To map Disk Array Expansion Units (DAEs) with expanders, use the “Enclosure Layout” page of the wizard.
- Drives connected through mapped array expanders will be identified as Slot X instead of Disk X in the interface, making it easier to identify them when hotswapped.
- If no DAE is detected, all drives will appear as Disk X and a warning will be issued.
What are my reporting options in Array?
Array Erase provides PDF and CSV reporting formats.
PDF Reports: Array generates PDF reports after the erasure process, providing detailed information about the steps and outcomes. You can personalize these reports with your company’s logo during setup.
CSV Reports: Array generates a continuous report of disk erasures in a CSV file format. By default, the report includes all data fields, giving you the flexibility to filter the data in software like Microsoft Excel according to your reporting requirements. If your organization has a specific data format, you can customize the CSV file to include only specific columns. During the setup process, you can create your own CSV format by clicking on the “Custom” button and providing a header and value for each desired column.
Can I customize reporting?
Yes, you can customize reporting in Array by choosing the specific columns you want in your CSV report file. To create your own CSV format, select “Custom” and enter a header and value for each desired column. You can also assign a batch name to erased drives for reporting purposes.
Array also lets you add extra fields to capture additional information like Customer Details, Operator ID, Defects, etc. You can set default names and values for these extra fields in the configuration.
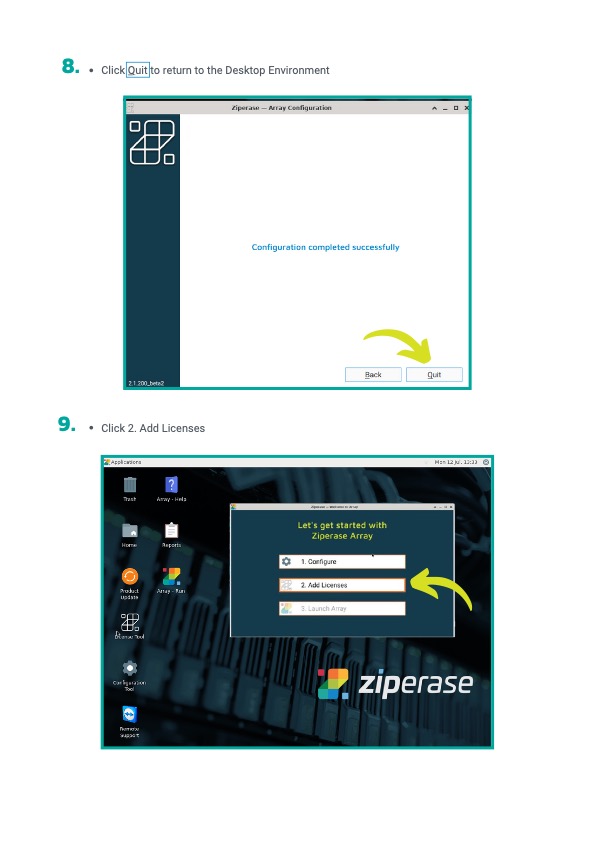
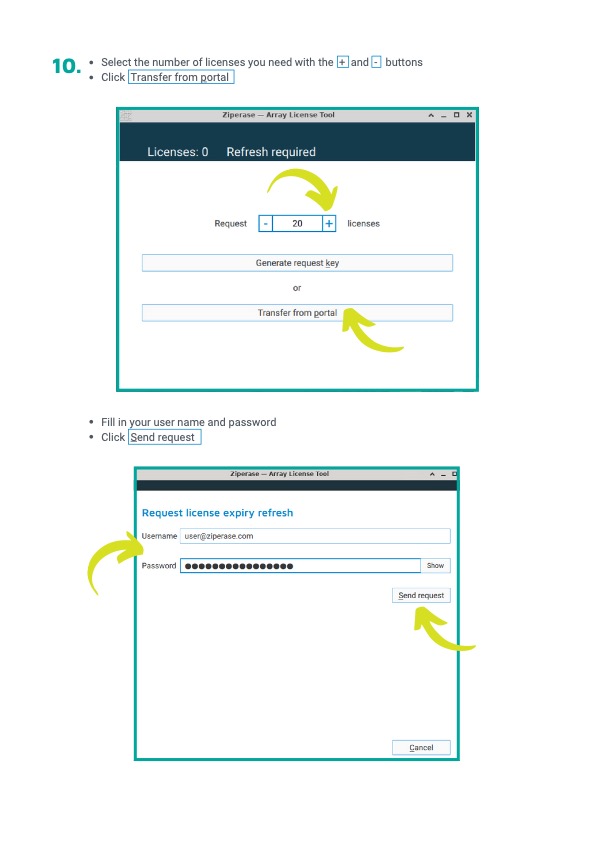
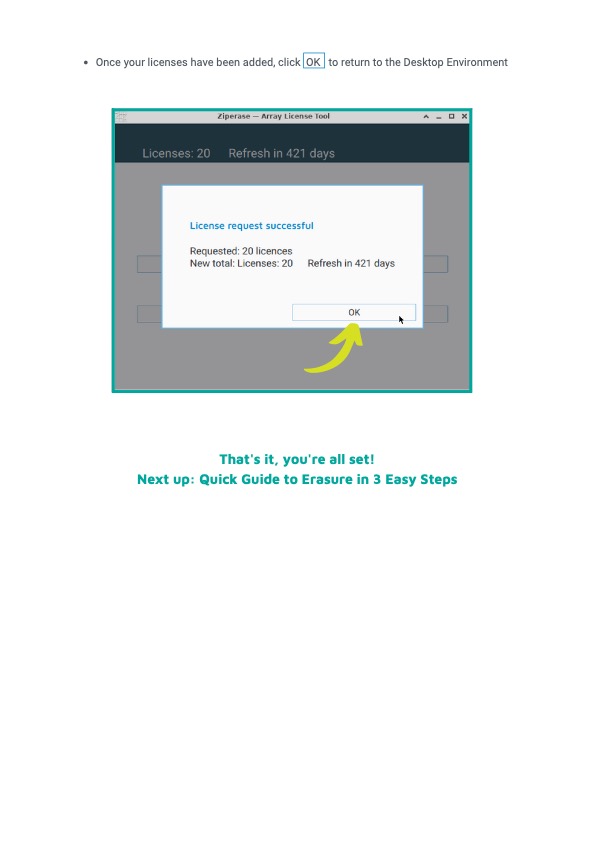
How do I add licenses with an internet connection?
- Click the License Tool icon on the desktop environment.
- Type the number of licenses to add into the Request box.
- Select “Transfer from portal”.
- Enter your Customer Portal username and password and click “Send Request”.
- Wait for the server response, and press “OK”, before exiting the license tool.
How do I add licenses without an internet connection?
- Click the License Tool icon on the desktop environment.
- Type the number of licenses to add into the Request box
- Click “Generate request key” and copy or make note of the generated request key. Do not close the page until the response key has been filled.
- On another computer with an internet connection or mobile phone, access the Request Licenses page in the Ziperase Customer Portal, then paste or type the generated key into the License Key text box
- Click “Make Request” and copy or make a note of the generated Response Key.
- Paste or type the response key into the request dialog on the License Tool in the Array application.
The Array Installation license store will be updated with the requested number of licenses and the refresh date will be extended.
How do I refresh licenses on my Array Server without adding new ones?
- On the desktop, launch the License Tool.
- Request 0 licenses.
- This will update the refresh date without changing the volume of licenses on the drive.
Can I customize the information captured during the erasure process?
Yes, Ziperase allows you to create customized fields to record values on a per-drive basis, such as location, customer and grading information, or for data cleansing. They are particularly useful when integrating Ziperase with third-party systems, allowing a human operator to clean up reported values like vendor or model names. The configuration contains some extra fields by default which can be deleted if you don’t want them.
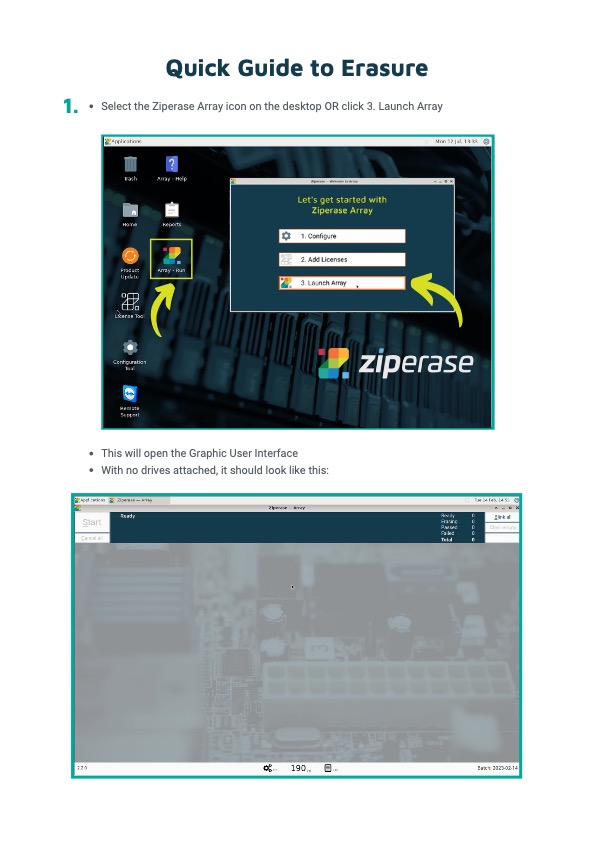
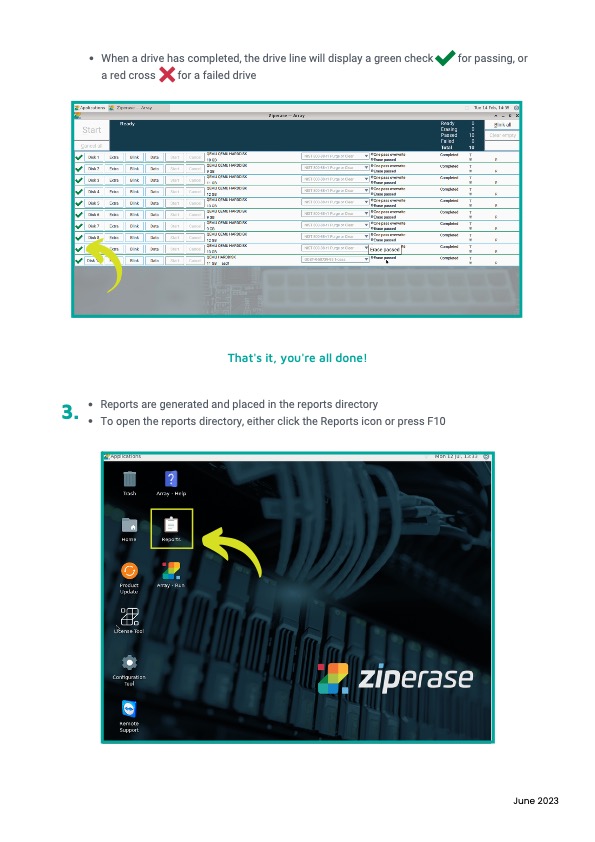
- Open the Array user interface by clicking the Ziperase Array icon on your desktop. The main screen will appear once the Ziperase server has finished initializing.
- Click “Extra” on the corresponding drive line in the interface to add additional field information.
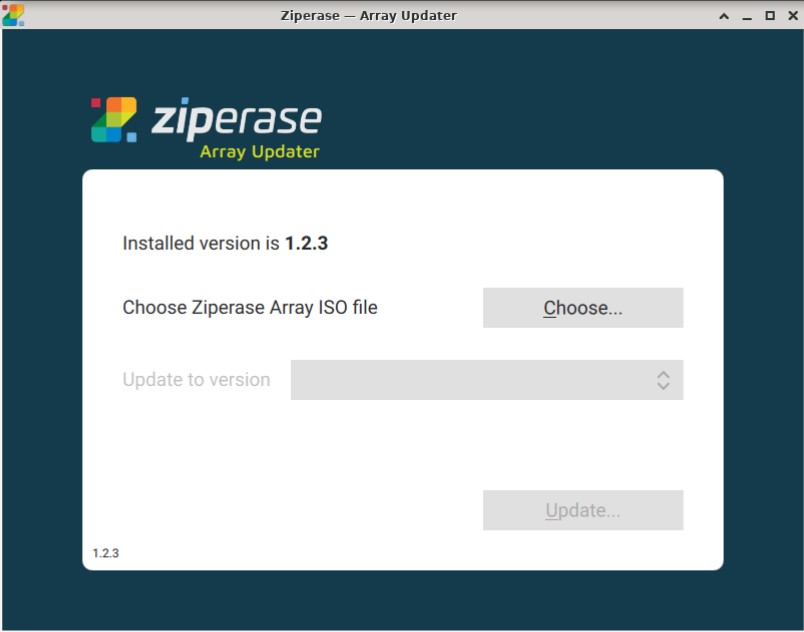
How do I update to the latest Array Erase software version?
As a best practice, remember to back up reports prior to any update. This is a precautionary measure as the updates happen in-place and all reports and configurations are maintained.
- The latest software version is always available in the Ziperase Customer Portal under the Downloads tab.
- Download the latest version of the Array ISO file onto Array Server.
- Go to Desktop, click “Product Update” icon.
- Click “Choose…” and select the downloaded Array ISO file.

- Confirm the new version of software in the “Update to version” field.
- Click “Update”.
- Once the update is completed, then click “Reboot” to reboot the server.
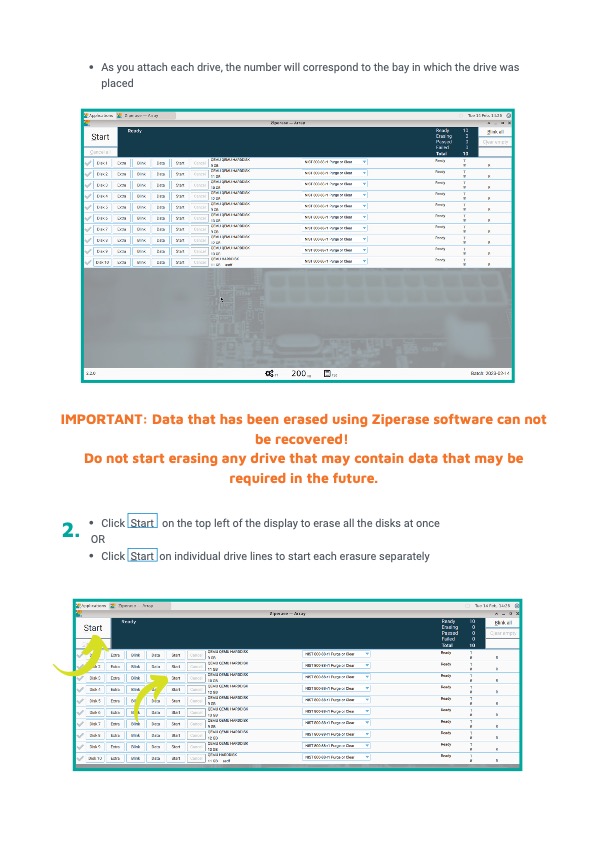
How do I hot swap drives with Array Erase?
- Start the Array user interface with no drives attached.
- Attach each drive to its corresponding bay based on its assigned drive number.
- When a drive is removed, its corresponding drive line will be grayed out to indicate its absence.
- When you insert a drive into a numbered bay, the inactive grayed-out drive line is automatically replaced by an active one.
- To clear any unused lines without adding new drives, click “Clear Empty” at the top left of the user interface.
What types of computer storage interfaces and technologies does Array Erase support?
Ziperase supports a wide range of storage including all of the following:
- ATA (Advanced Technology Attachment): a type of interface used to connect storage devices, such as hard disk drives (HDDs), to a computer’s motherboard.
- eMMC (embedded MultiMediaCard): a type of flash storage commonly used in smartphones, tablets, and other portable devices.
- FibreChannel: a high-speed data transfer protocol often used in enterprise storage systems.
- IDE (Integrated Drive Electronics): an older type of interface used to connect storage devices to a computer’s motherboard.
- NVMe (Non-Volatile Memory Express): an interface protocol designed specifically for high-performance solid-state drives (SSDs).
- RAID (Redundant Array of Independent Disks): a data storage technology that combines multiple physical disk drives into a single logical unit for improved performance, reliability, or both.
- SAS (Serial Attached SCSI): a type of interface used to connect storage devices, such as HDDs or SSDs, to a computer’s motherboard or a storage controller.
- SATA (Serial Advanced Technology Attachment) is a type of interface commonly used to connect HDDs, SSDs, and optical disc drives to a computer’s motherboard.
- SCSI (Small Computer System Interface) is an older interface standard used to connect various types of computer peripherals, including storage devices, to a computer’s motherboard or other device.
What erasure patterns does Ziperase employ when destroying data?
Ziperase Array Erase data erasure software employs the following data erasure patterns when securely destroying data:
- CESG CPA 3-pass
- GOST-R-50739-95 1-pass
- GOST-R-50739-95 2-pass
- Gutmann Method 35- pass
- Standard Overwrite 1-pass
- NAVSO P-5239-26 MFM 3-pass
- NAVSO P-5239-26 RLL 3- pass
- NIST 800-88-r1 Purge
- NIST 800-88-r1 Purge or Clear
- DoD 5520.22-M (E) 3- pass
- DoD 5520.22-M (ECE) 7- pass
- CESG CPA 3-pass
- HMG IAS 5 Lower 1-pass
- HMG IAS 5 Lower 3-pass (new manual)
- US Army AR-380-19 3- pass
- VSITR 7-pass
What technologies does Ziperase Array Erase software support?
Ziperase Array Erase supports the following technologies:
- HDD (Hard Disk Drive): a type of magnetic storage device that uses spinning disks to read and write data.
- SSD (Solid State Drive): a type of storage device that uses NAND-based flash memory to store data, and has no moving parts.
USB (Universal Serial Bus): a standard interface used to connect various devices, including storage devices, to a computer or other device. - RAID dismantling refers to the process of breaking down a RAID array (a configuration of multiple physical disk drives into a single logical unit) into its individual component drives.
- Multiple block size drives refers to storage devices that can support different block sizes (the smallest unit of data that can be written or read from a storage device) for different use cases or workloads, such as databases or large file transfers.